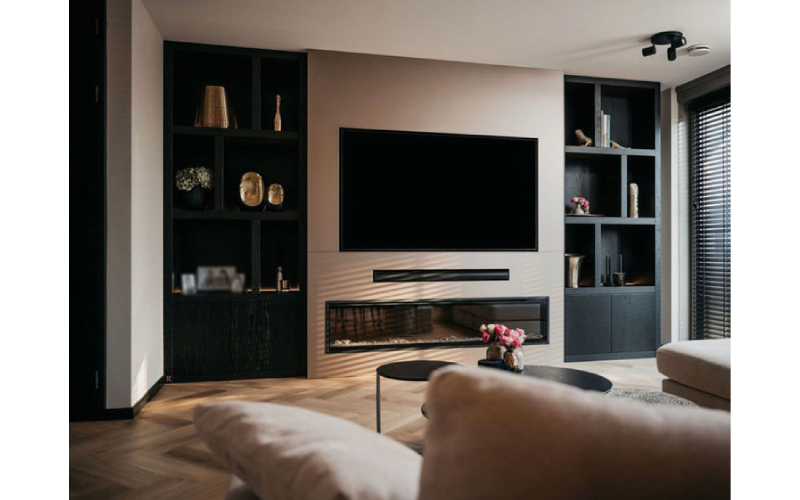
Bespoke media walls offer a smart way to organize sound systems and hide wiring, creating cleaner and more functional living spaces. Built with sturdy frames, they securely hold heavy TVs and speakers while providing shelves or cabinets for subwoofers. Wiring is cleverly run inside the wall structure using low-voltage boxes and properly rated cables to stay out of sight, yet easy to access when needed. Designers also include ventilation gaps to keep electronics cool and plan cable paths for future upgrades. Overall, these custom walls improve acoustics by positioning components well, reduce clutter through concealed wire management, and blend nicely with the room’s style.
Purpose and Benefits of Bespoke Media Walls
Bespoke media walls are designed to create a dedicated, organized space that neatly houses TVs, speakers, sound systems, gaming consoles, and media players all in one place. By integrating storage and cable management directly into the structure, these walls reduce clutter and hide unsightly wires, giving the room a clean, streamlined appearance. They can be customized to match the style and finishes of the existing room decor, ensuring a seamless and professional look that enhances overall aesthetics. Beyond looks, bespoke media walls optimize the placement of components, improving acoustics and offering better viewing angles for a more immersive experience. Custom sizing options allow them to fit perfectly in any room, accommodating specific equipment needs. These walls also serve as a central hub for entertainment devices, making access easier and more convenient while eliminating bulky furniture or stands. Built-in shelves and cabinets protect electronics from dust and damage, and thoughtful cable routing encourages better organization with designated paths inside the wall. Additionally, they support smart home integration by embedding controls and connections within the design, making the media wall not just stylish but functional and future-ready.
- Provide a dedicated and organized space within the wall to house TVs, speakers, sound systems, gaming consoles, and media players, keeping everything neat.
- Integrate storage and cable management directly into the wall structure to reduce clutter and visible wires.
- Match the style and finishes of the media wall to the existing room decor for a seamless, professional look.
- Optimize component placement for improved acoustics and better viewing angles.
- Allow customization options to fit specific room sizes and equipment needs.
- Create a central hub for entertainment devices, making access and use more convenient.
- Enhance room aesthetics by eliminating bulky furniture or stands for media devices.
- Use built-in shelves and cabinets to protect equipment from dust and damage.
- Encourage better cable organization by providing designated routing paths within the wall.
- Support integration with smart home systems by embedding controls and connections inside the media wall.

How Bespoke Media Walls Provide Structural Support for Sound Systems?
Bespoke media walls are built with sturdy framing made from wood or metal studs that can handle the weight of heavy TVs and sound equipment. The TV mounts are securely fastened to this frame, ensuring the screen stays safely in place while allowing for adjustable positioning. Shelving and cabinets designed to hold speakers, subwoofers, and other audio devices are supported by reinforced framing with blocking and cross-bracing to prevent sagging and support heavier components. For in-wall or on-wall speakers, rough-in brackets or back boxes are installed to reduce sound transfer through the wall, which improves audio clarity. Proper planning ensures mounting points align directly with studs to maximize load-bearing capacity and account for both current and future equipment weight. The frame layout also allows easy access to wiring paths for multiple subwoofers, enabling optimal bass placement. To enhance sound quality, speaker mounts are sometimes isolated from the framing to reduce vibrations and resonance. This careful structural design not only supports the physical demands of the sound system but also contributes to a cleaner, more efficient setup that blends seamlessly into the room.
Design and Planning for Sound Systems and Wiring
Careful measurement of room dimensions and media equipment sizes is essential to plan the layout of a bespoke media wall. This ensures that each component, from TVs to speakers, fits perfectly and functions optimally. Choosing durable materials like solid wood or engineered wood helps support the weight of heavy electronics, while metal or glass can add modern style and strength where needed. Proper ventilation must be included through gaps or vents in cabinetry to prevent devices from overheating, which can reduce their lifespan. Early mapping of cable routes avoids clashes with structural elements and electrical wiring, while planning extra conduits and wiring capacity allows for future upgrades without tearing down walls. Speaker placement within the media wall should be carefully determined to maximize sound coverage and clarity, often using rough-in brackets or back boxes to improve audio quality. Accessibility is another key factor: removable panels or access points let users perform maintenance or add components easily. Including space for smart controls and automation hardware streamlines integration with home systems. Additionally, acoustic treatments like sound-absorbing panels or special backing materials can be incorporated during design to enhance sound performance. Lighting, such as LED strips behind shelves or screens, not only highlights the media wall but enhances usability in low-light settings. By combining these elements in the planning stage, bespoke media walls provide both an elegant look and a practical, future-ready foundation for sound systems and hidden wiring.
Techniques for Cable Management and Hidden Wiring
Running all electrical and media cables inside the media wall frame keeps wiring completely out of sight, creating a clean, streamlined look. Using low-voltage electrical boxes for AV connections and volume controls makes installation neater and provides easy access for maintenance. Choosing CL2 or CL3 rated speaker wires ensures compliance with safety codes for in-wall use, reducing fire risks. Labeling cables clearly at both ends helps installers quickly identify and troubleshoot connections, which is especially useful during upgrades. Nail plates installed over wiring paths protect cables from accidental damage during drywall work. Neatly bundling cables with ties and securing them to studs every few feet keeps wiring stable and prevents sagging or tangling. Running cables through conduit or flexible tubing simplifies future replacements or additions by allowing wires to be pulled through without opening walls. To minimize interference, high-voltage electrical wiring should cross AV cables at right angles, and cable routes should avoid sharp bends or pinch points that could damage insulation. Including pull strings inside conduits further eases the process of adding or swapping cables later on. These techniques work together to keep wiring hidden, protected, and organized inside bespoke media walls, supporting both the aesthetics and functionality of modern sound systems.
Best Practices for In-Wall Wiring Installation
When installing wiring inside bespoke media walls, maintaining the structural integrity of the studs is crucial. Drill holes no larger than 40% of the stud width and avoid edges to prevent weakening the frame. Keep audio and video cables at least 12 inches away from high-voltage electrical wiring to reduce interference; if they must cross, do so at a 90-degree angle. Using 4-conductor speaker wires lets you support stereo pairs with fewer cables, keeping the wall clutter-free and organized. It’s smart to plan for future needs by leaving wire loops in walls for devices like volume controls, even if you don’t install them right away. Installing rough-in brackets or new construction speaker mounts before drywall makes speaker setup easier and cleaner later on. For added flexibility, run cables through flexible conduit with a minimum diameter of 1.5 inches, which helps future upgrades without tearing into walls. Secure cables carefully with staples or clamps, but avoid pinching or damaging insulation to maintain signal quality. Before closing up walls, test cable continuity and label both ends to save time and expense on troubleshooting down the line. Always follow local electrical and building codes to ensure safety and compliance. Finally, document your wiring with photos and diagrams for easy reference during future repairs or upgrades.
Protecting Wiring During Media Wall Construction
During the construction of bespoke media walls, protecting wiring is essential to ensure system reliability and safety. Exposed cables should be covered with plastic wrap and secured with electrical tape to shield them from paint, plaster, or dust damage. Bundling wires with ties and clamps, spaced every 4.5 feet and near junction boxes, helps keep cables stable and prevents strain or accidental movement. Before drywall is installed, taking photos or videos of wiring routes provides valuable documentation for future reference or troubleshooting. When pulling cables through tight or finished spaces, using fish tape or fish sticks reduces the risk of damaging the wires. It is important to avoid sharp bends or kinks in cables, as these can degrade signal quality. Additionally, keeping wiring away from heat sources and abrasive surfaces inside the wall protects insulation and prevents wear. Clear labeling of cables before and after installation avoids confusion during construction and later maintenance. Coordination with drywall installers is critical to prevent accidental nail or screw punctures in wiring paths; installing protective nail plates over cables adds an extra layer of safety. Post-installation testing ensures no wiring was damaged during construction phases. Finally, storing spare cables and connectors nearby allows for quick repairs if any issues arise, minimizing downtime and maintaining the media wall’s performance.
Ventilation and Acoustic Features in Media Walls
Proper ventilation is essential in bespoke media walls to keep electronic components cool and functioning well. Incorporating vents or strategic gaps allows heat to escape and fresh air to circulate around devices, preventing overheating that can shorten their lifespan. It’s important not to seal components tightly without airflow. Behind speakers and other equipment, leaving space supports heat dissipation and makes cable management easier. Acoustic treatment also plays a key role in enhancing sound quality. Using soundproofing materials like acoustic panels or foam inside or around the media wall reduces sound leakage and unwanted echoes. Speaker back boxes can isolate sound from the wall cavity, improving clarity and bass response. Positioning speakers carefully within the media wall helps avoid obstruction, ensuring sound travels freely. To maintain a clean look while preserving audio performance, materials such as perforated panels or fabric coverings can be used, allowing sound to pass through without revealing wiring or devices. Complementing the media wall with rugs, curtains, or wall treatments further controls reflections and absorption, contributing to better room acoustics. Planning ahead by leaving room for additional acoustic panels or treatments enables easy future upgrades to optimize the listening experience as needed.
Finishing Touches to Customize Media Walls
Applying paint, stain, trim, or molding helps tie the media wall into the existing room decor, giving a polished and cohesive look. LED lighting installed behind TVs or along shelves adds subtle ambiance while highlighting key equipment. Integrating smart home controls directly into the media wall lets users manage lighting, sound, and media systems seamlessly. In areas where in-wall wiring isn’t possible, cable concealers, flat speaker wire tape, or routing wires behind baseboards and door frames keep cables hidden without compromising aesthetics. Adding decorative elements such as glass doors or metal grills can blend style with function by protecting components and allowing sound to pass through. Adjustable shelving and modular components offer flexibility to rearrange or upgrade equipment as needed. Choosing finishes that resist dust and are easy to clean simplifies maintenance. Ventilation grills designed to blend with the media wall’s look ensure proper airflow without drawing attention. Using hardware finishes consistent with other room elements reinforces design unity. Finally, subtle labels or discreet markings near access points or switches improve usability without disrupting the clean appearance.
Future-Proofing Media Walls for Upgrades
Planning a bespoke media wall with future upgrades in mind means running extra cable lengths and installing additional conduits during the initial build. This approach avoids major work later when technology changes or new devices need to be added. For example, pre-wiring Ethernet cables for multiple wireless access points supports expanding smart home networks without rewiring walls. Including spare speaker wire runs allows easy testing of subwoofer placements or adding surround sound channels down the road. Using flexible conduits with pull strings makes cable replacement or upgrades straightforward, even after drywall is installed. Designing spaces with modular cabinetry or panels lets homeowners swap components or add new devices without removing wall finishes. It’s also wise to leave room for emerging technologies by allocating space for new connectors or control systems that may become standard. Proper documentation of wiring paths and cable types helps future installers understand the setup and avoid costly mistakes. Choosing materials and finishes that are easy to repaint or modify ensures the media wall can adapt to changing styles. Additionally, planning for future ventilation needs prevents overheating when more equipment is installed later. These steps make the media wall a long-lasting, flexible hub for entertainment and smart home systems.
Safety and Compliance in Media Wall Wiring
Ensuring safety and compliance during the installation of wiring in bespoke media walls is critical. All wiring must follow local building and electrical codes, which often require the use of code-approved cables such as CL2 or CL3 rated wires to reduce fire risks within wall cavities. It’s important to avoid drilling or cutting into load-bearing beams, headers, or other structural elements to maintain the integrity of the wall. To protect cables from accidental punctures during drywall installation or later work, nail plates should be installed where wiring passes through studs. Proper grounding and bonding of electrical components within the media wall ensure safe operation and reduce the risk of electrical hazards. Before closing walls, all wiring should be tested with appropriate tools to confirm correct installation and functionality. Keeping wiring pathways accessible for future inspection or repair is often required by code and helps prevent costly renovations later. Using fire-resistant materials during media wall construction further supports compliance with safety standards. Documentation of all safety measures, including permits and inspection records, is essential for accountability and future reference. When dealing with power and data wiring, consulting or hiring professional electricians or AV integrators helps guarantee that installations meet both safety and technical standards. Following these precautions not only protects the home and its occupants but also ensures the media wall supports sound systems and hidden wiring reliably over time.
Frequently Asked Questions
1. How do bespoke media walls help in organizing sound systems effectively?
Bespoke media walls are designed to fit sound systems perfectly, keeping speakers, receivers, and other components neatly arranged. This setup reduces clutter, improves accessibility, and helps maintain better sound quality by allowing optimal placement and spacing.
2. In what ways do custom media walls hide wiring for sound systems?
Custom media walls include built-in channels and compartments that conceal cables and wires from view. These hidden pathways prevent tangled cords, reduce tripping hazards, and give the area a clean, streamlined look without sacrificing functionality.
3. Can a tailored media wall improve the acoustics of a room with a sound system?
Yes, bespoke media walls can be crafted with materials and shapes that minimize unwanted echoes and sound reflections. Proper design can enhance sound clarity and distribution, making the listening experience more immersive and balanced across the room.
4. What design features in bespoke media walls support integration with advanced sound technology?
Features like adjustable shelving, dedicated spaces for subwoofers, and ventilation areas help integrate modern sound equipment. Also, they allow easy upgrades or replacements of components while keeping all connections well-hidden and organized.
5. How do custom media walls simplify maintenance and troubleshooting of sound systems?
By having designated access points and organized wiring paths, bespoke media walls make it easier to identify and fix issues without dismantling large sections. This thoughtful design reduces downtime and keeps your system running smoothly with minimal hassle.
TL;DR Bespoke media walls offer an organized and stylish way to house sound systems and hide wiring by combining strong structural support with smart cable management. They’re built with sturdy framing to securely hold TVs and speakers while integrating ventilation and acoustic features to optimize performance. Thoughtful design includes hidden wiring using code-compliant cables, protective measures during installation, and future-proofing for easy upgrades. Finishing touches like custom paint, lighting, and smart home integration enhance both aesthetics and function, all while following safety and building code standards.