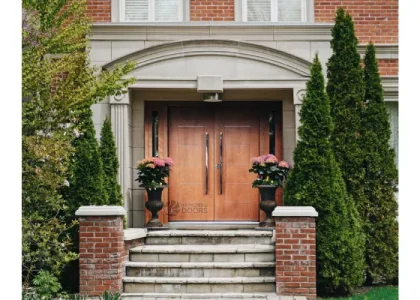
To install heavy duty shelf brackets for maximum strength, start by picking brackets with strong diagonal supports designed for big loads. Make sure to check their weight ratings and space them no more than 16 to 24 inches apart. Use a stud finder to locate wall studs, since anchoring directly into studs is key for stability. Mark your bracket positions with a level and pencil, then pre-drill holes to avoid cracking the wood. Secure brackets firmly using multiple heavy-duty screws or toggle bolts if no studs are available. Finally, attach shelves carefully by pre-drilling screw holes and double-checking everything stays level throughout the process.
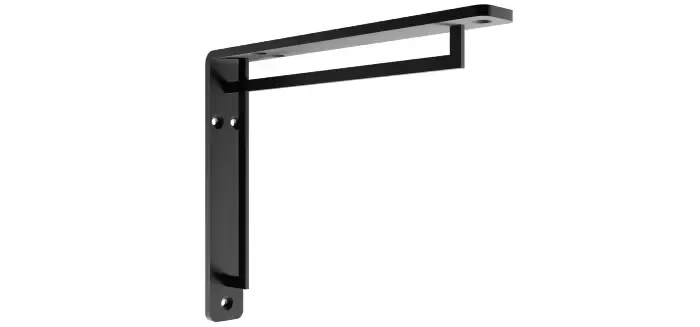
Choosing the Right Heavy-Duty Shelf Brackets
Selecting the right heavy duty shelf brackets is key to ensuring your shelves can support the intended load safely. For large weights, choose brackets with diagonal support or heavy-duty floating designs, as these provide extra strength by distributing weight more effectively. Always check the manufacturer’s recommended weight capacity, which should include both the shelf itself and the items you plan to place on it. When dealing with heavy loads, opt for larger brackets and space them closer together, typically between 16 and 24 inches apart, to prevent sagging or failure. Consider adjustable shelf tracks if you want flexibility in shelf height without sacrificing strength. The bracket material matters too, steel or heavy gauge metals are best for durability, while plastic or light-gauge brackets should be avoided since they won’t hold up under heavy weight. Look for brackets with multiple mounting holes so the load spreads evenly across several fasteners, increasing stability. Also, make sure the hardware provided or selected matches your wall type, whether it’s drywall, masonry, or tile, to guarantee a secure installation. Finally, if your shelves will be installed in damp or humid areas, pick brackets with corrosion-resistant finishes to prevent rust and extend their lifespan. Matching the bracket size to your shelf’s depth and expected load ensures a balanced and strong setup.

Essential Tools and Materials for Installation
To install heavy duty shelf brackets securely, having the right tools and materials is crucial. Start with a stud finder to pinpoint wall studs accurately, as anchoring brackets into studs provides the best support. A long level or a level placed on a straight board helps ensure brackets line up perfectly, preventing uneven shelves. A power drill equipped with wood, masonry, and tile bits covers all wall types you might encounter. For fastening, use heavy-duty wood screws, size #10 or #12, ranging from 1.5 to 3.5 inches long, depending on the thickness of your wall and bracket. If you’re mounting on drywall without studs, toggle bolts or wall anchors rated for heavy loads offer reliable alternatives. For brick or concrete walls, masonry anchors and concrete screws are necessary to handle the tough material. Marking bracket positions precisely with a pencil or masking tape helps keep your layout consistent. If you’re customizing brackets, a saw and clamps will let you cut and shape wood pieces to size. Should drywall cutting be required, a drywall saw and clips make removal and repair manageable. Finally, caulk and grout are handy for sealing edges and finishing backsplash areas, protecting your walls from moisture and giving your shelf installation a polished look.
- Stud finder to locate wall studs accurately
- Long level or level on a straight board for aligning brackets
- Power drill with wood, masonry, and tile drill bits
- Heavy-duty wood screws, size #10 or #12, length 1.5 to 3.5 inches
- Toggle bolts or wall anchors rated for heavy loads on drywall
- Masonry anchors and concrete screws for brick or concrete walls
- Pencil or masking tape for marking bracket positions
- Saw and clamps for cutting or shaping custom brackets
- Drywall saw and clips if drywall needs cutting and repair
- Caulk and grout for finishing edges and sealing backsplash areas
Preparing Your Wall and Marking Studs
Start by using a stud finder to locate the wall studs accurately. Move the stud finder slowly across the wall and mark each stud location clearly with a pencil. To double-check these spots, tap lightly on the wall or drive a small nail to confirm the stud’s presence behind the drywall. Plan your bracket placement so each bracket will be mounted directly into a stud for maximum strength. If the studs are spaced too far apart, prepare to use strong toggle bolts or heavy-duty anchors to support the load. Next, use a long level to draw a straight, horizontal line across the wall where the brackets will sit; this ensures all brackets will align evenly. For floating shelves, keep bracket mounts inside the stud boundaries to maximize support. Take consistent measurements from the floor or ceiling to keep all markings uniform across the wall. Avoid locating brackets where there might be electrical wiring or plumbing pipes by checking behind the wall or using a multi-purpose detector. Finally, inspect the wall surface for any holes, cracks, or uneven areas and repair them before mounting brackets to create a solid, stable base for installation.
Step-by-Step Guide to Mounting Brackets
Start by marking the exact bracket positions on a level line, making sure each bracket is centered on a wall stud for maximum support. Use a stud finder to locate studs precisely, then draw a straight, level line across the wall to guide placement. Next, pre-drill pilot holes at each marked spot using a drill bit sized correctly for your screws or anchors; this prevents splitting wood or drywall and ensures screws go in straight. If you’re installing on drywall without studs, insert appropriate wall anchors or toggle bolts rated for heavy loads. For masonry walls, use a masonry drill bit and concrete anchors designed for brick or concrete. When fastening the brackets, use multiple heavy-duty screws (at least 2 or 3 per bracket) to distribute the load evenly. Tighten screws firmly but avoid overtightening, which can strip holes or damage the wall. Use a level to check bracket alignment before fully tightening screws to keep shelves straight. For toggle bolts, insert the toggle carefully behind the drywall and tighten slowly to secure without damaging the wall. After all brackets are mounted, recheck the level line to confirm everything is perfectly aligned before placing shelves.
How to Build and Install Custom Brackets?
Start by cutting 2×4 lumber to your desired arm lengths, typically around 24 inches for both the wall-mounted arm and the shelf-supporting arm. To add strength, include a 45-degree diagonal brace between these two arms. Use 2.5-inch wood screws to attach the brace securely, and spacer blocks can help maintain the correct height for a snug fit. When mounting, attach the shorter arm directly to the wall studs for maximum support. The longer arm should be oriented horizontally to carry the shelf’s weight effectively. Always pre-drill screw holes to prevent the wood from splitting and use self-drilling or heavy-duty wood screws to ensure a strong hold. Position the brackets so that the downward force on the shelf translates into shear force on the screws, which is much easier for the fasteners to handle. Before installation, sand all lumber surfaces smoothly to avoid splinters and finish with paint or a sealant to protect the wood from moisture and improve appearance. This approach creates sturdy, custom brackets capable of supporting heavy loads reliably.
Attaching Shelves Securely to Brackets
To attach shelves securely to heavy-duty brackets, start by pre-drilling holes on the underside of the shelf. This prevents the wood from splitting when you insert screws. Be sure to choose screws that match the thickness and material of your shelf; for example, thicker wood requires longer, heavier gauge screws. If you want extra hold, especially for heavy loads, apply a strong construction adhesive like liquid nails between the shelf and bracket before fastening. Make sure the shelf fits snugly on the bracket arms, which is particularly important for floating shelves where any gap can reduce stability. For very heavy items, consider screwing through the bracket arms directly into the shelf to distribute weight more effectively. When driving screws in, countersink the heads so they sit flush or just below the shelf surface for a clean look and to avoid snagging. After securing, use a level to check the shelf’s alignment and make small adjustments if needed. If you are gluing the shelf, use clamps to hold it firmly in place until the adhesive cures. Avoid letting the shelf overhang too much beyond the bracket arms, as this puts unnecessary stress on the brackets and fasteners. Finally, keep in mind the shelf material’s weight when selecting screws and adhesives, heavier materials like hardwood or thick plywood will need sturdier hardware to ensure a lasting, secure installation.
Finishing Touches for a Clean Look
Once your heavy duty shelf brackets and shelves are securely installed, take a moment to check the final shelf level and make any necessary screw adjustments to ensure everything sits perfectly flat. If you had to cut drywall for bracket installation, patch those areas using drywall clips and joint compound to restore a smooth surface. Around the edges of the shelves and brackets, apply caulk to seal any gaps, preventing dust buildup and moisture intrusion. If your shelf is near a tiled backsplash, grout the tiles to protect against water damage and maintain a clean appearance. When drilling into tile, always use masking tape over the drill spot to reduce the risk of cracking and start drilling at a slight angle to create a guide. Touch up any wall paint or finish disturbed during installation to blend the area seamlessly with the surrounding wall. Clear off all dust and debris from drilling and sanding before applying finishes. If your shelf blocks natural light, consider installing under-shelf lighting to brighten the space. For a polished look, add trim molding to hide bracket edges, especially if the brackets are bulky or visually intrusive. Finally, double-check that all screws and anchors are tight and secure to maintain the shelf’s strength and safety over time.
Installing Brackets on Drywall, Masonry, and Tile
When installing heavy duty shelf brackets on drywall, always try to anchor directly into studs for the strongest hold. Use a stud finder to locate studs and mark them clearly. If brackets must go where no studs are present, opt for toggle bolts or heavy-duty anchors designed for drywall to ensure the brackets can carry the load safely. For masonry or concrete walls, use masonry drill bits to create holes and secure brackets with concrete anchors. When drilling into tile, start by placing masking tape on the drill points to prevent the bit from slipping and cracking the surface. Begin drilling at a slight angle to create a guide hole before moving to a straight position. If the tile covers studs behind the wall, use lag bolts to anchor the brackets into the studs for maximum strength. Be careful not to overtighten anchors or screws, as this can damage the wall or tile. Always match the anchor type to the wall material for a secure hold. After installation, test the bracket strength by applying gradual weight before loading heavy items to ensure they are firmly attached.
Frequently Asked Questions
1. What type of wall is best for installing heavy duty shelf brackets for maximum strength?
Stud walls made of wood or metal are ideal because they offer strong anchoring points. Drywall alone is not strong enough, so always find and secure brackets into wall studs for the best support.
2. How do I choose the right screws and anchors to ensure the brackets hold heavy loads?
Use screws that match the bracket size and length to reach deep into the studs. For extra strength on hollow walls, heavy-duty anchors like toggle bolts or molly bolts work well, but securing directly into studs is always stronger.
3. What is the proper spacing between shelf brackets to avoid sagging under heavy weight?
Generally, spacing brackets 16 to 24 inches apart gives good support. Closer spacing may be needed for longer or heavier shelves to distribute weight evenly and prevent sagging over time.
4. How can I make sure the shelf brackets are level and properly aligned during installation?
Use a level to mark bracket positions before drilling. Measure from a reference point and double-check the level after mounting each bracket to keep the shelf straight and balanced, which helps maintain strength.
5. What steps should I take to prep the wall surface for installing heavy duty brackets securely?
First, locate and mark the studs. Clear away any dust or debris from the wall surface and pilot drill holes to avoid splitting studs when inserting screws. These steps ensure a solid and stable installation for maximum strength.
TL;DR To install heavy duty shelf brackets for maximum strength, choose brackets rated for your load and space them 16-24 inches apart, anchoring directly into wall studs whenever possible. Use the right tools like a stud finder, level, power drill, and heavy-duty screws or anchors suited for your wall type (drywall, masonry, or tile). Mark and pre-drill holes carefully, secure brackets with multiple screws, and ensure shelves are firmly attached without splitting the wood. Consider building custom brackets with diagonal braces for extra support. Finish by leveling shelves, repairing drywall if needed, and caulking around edges for a clean, long-lasting result. Proper planning and technique ensure your shelves safely hold heavy items over time.